01 What Is Meshtastic?
Meshtastic is an open-source, long-range, low-power mesh networking platform built on LoRa (Long Range) radio hardware. Every device is simultaneously a node, a router, and a relay — no single point of failure, no infrastructure dependency.
| Property | Value |
|---|---|
| Protocol | LoRa (chirp spread spectrum radio) |
| Range per hop | 5–30 km line-of-sight; multi-hop extends to 100+ km |
| Power | Runs weeks on battery; solar-sustainable |
| Cost per node | $15–$40 USD |
| Encryption | AES-256 per channel, on by default |
| License | Apache 2.0 — fully open source |
| Bandwidth | ~1–10 kbps (text + telemetry, not video) |
02 Why It Exists
| Problem | Meshtastic Answer |
|---|---|
| Disaster communication | Works when cell and internet are down |
| Remote field operations | No SIM card, no monthly subscription |
| Privacy | Encrypted by default, no central server |
| Cost | $25 node vs. $300+ satellite communicator |
| IoT telemetry over distance | Sensor data over km ranges with µA sleep current |
| Community resilience | Mesh grows as nodes are added — no re-configuration |
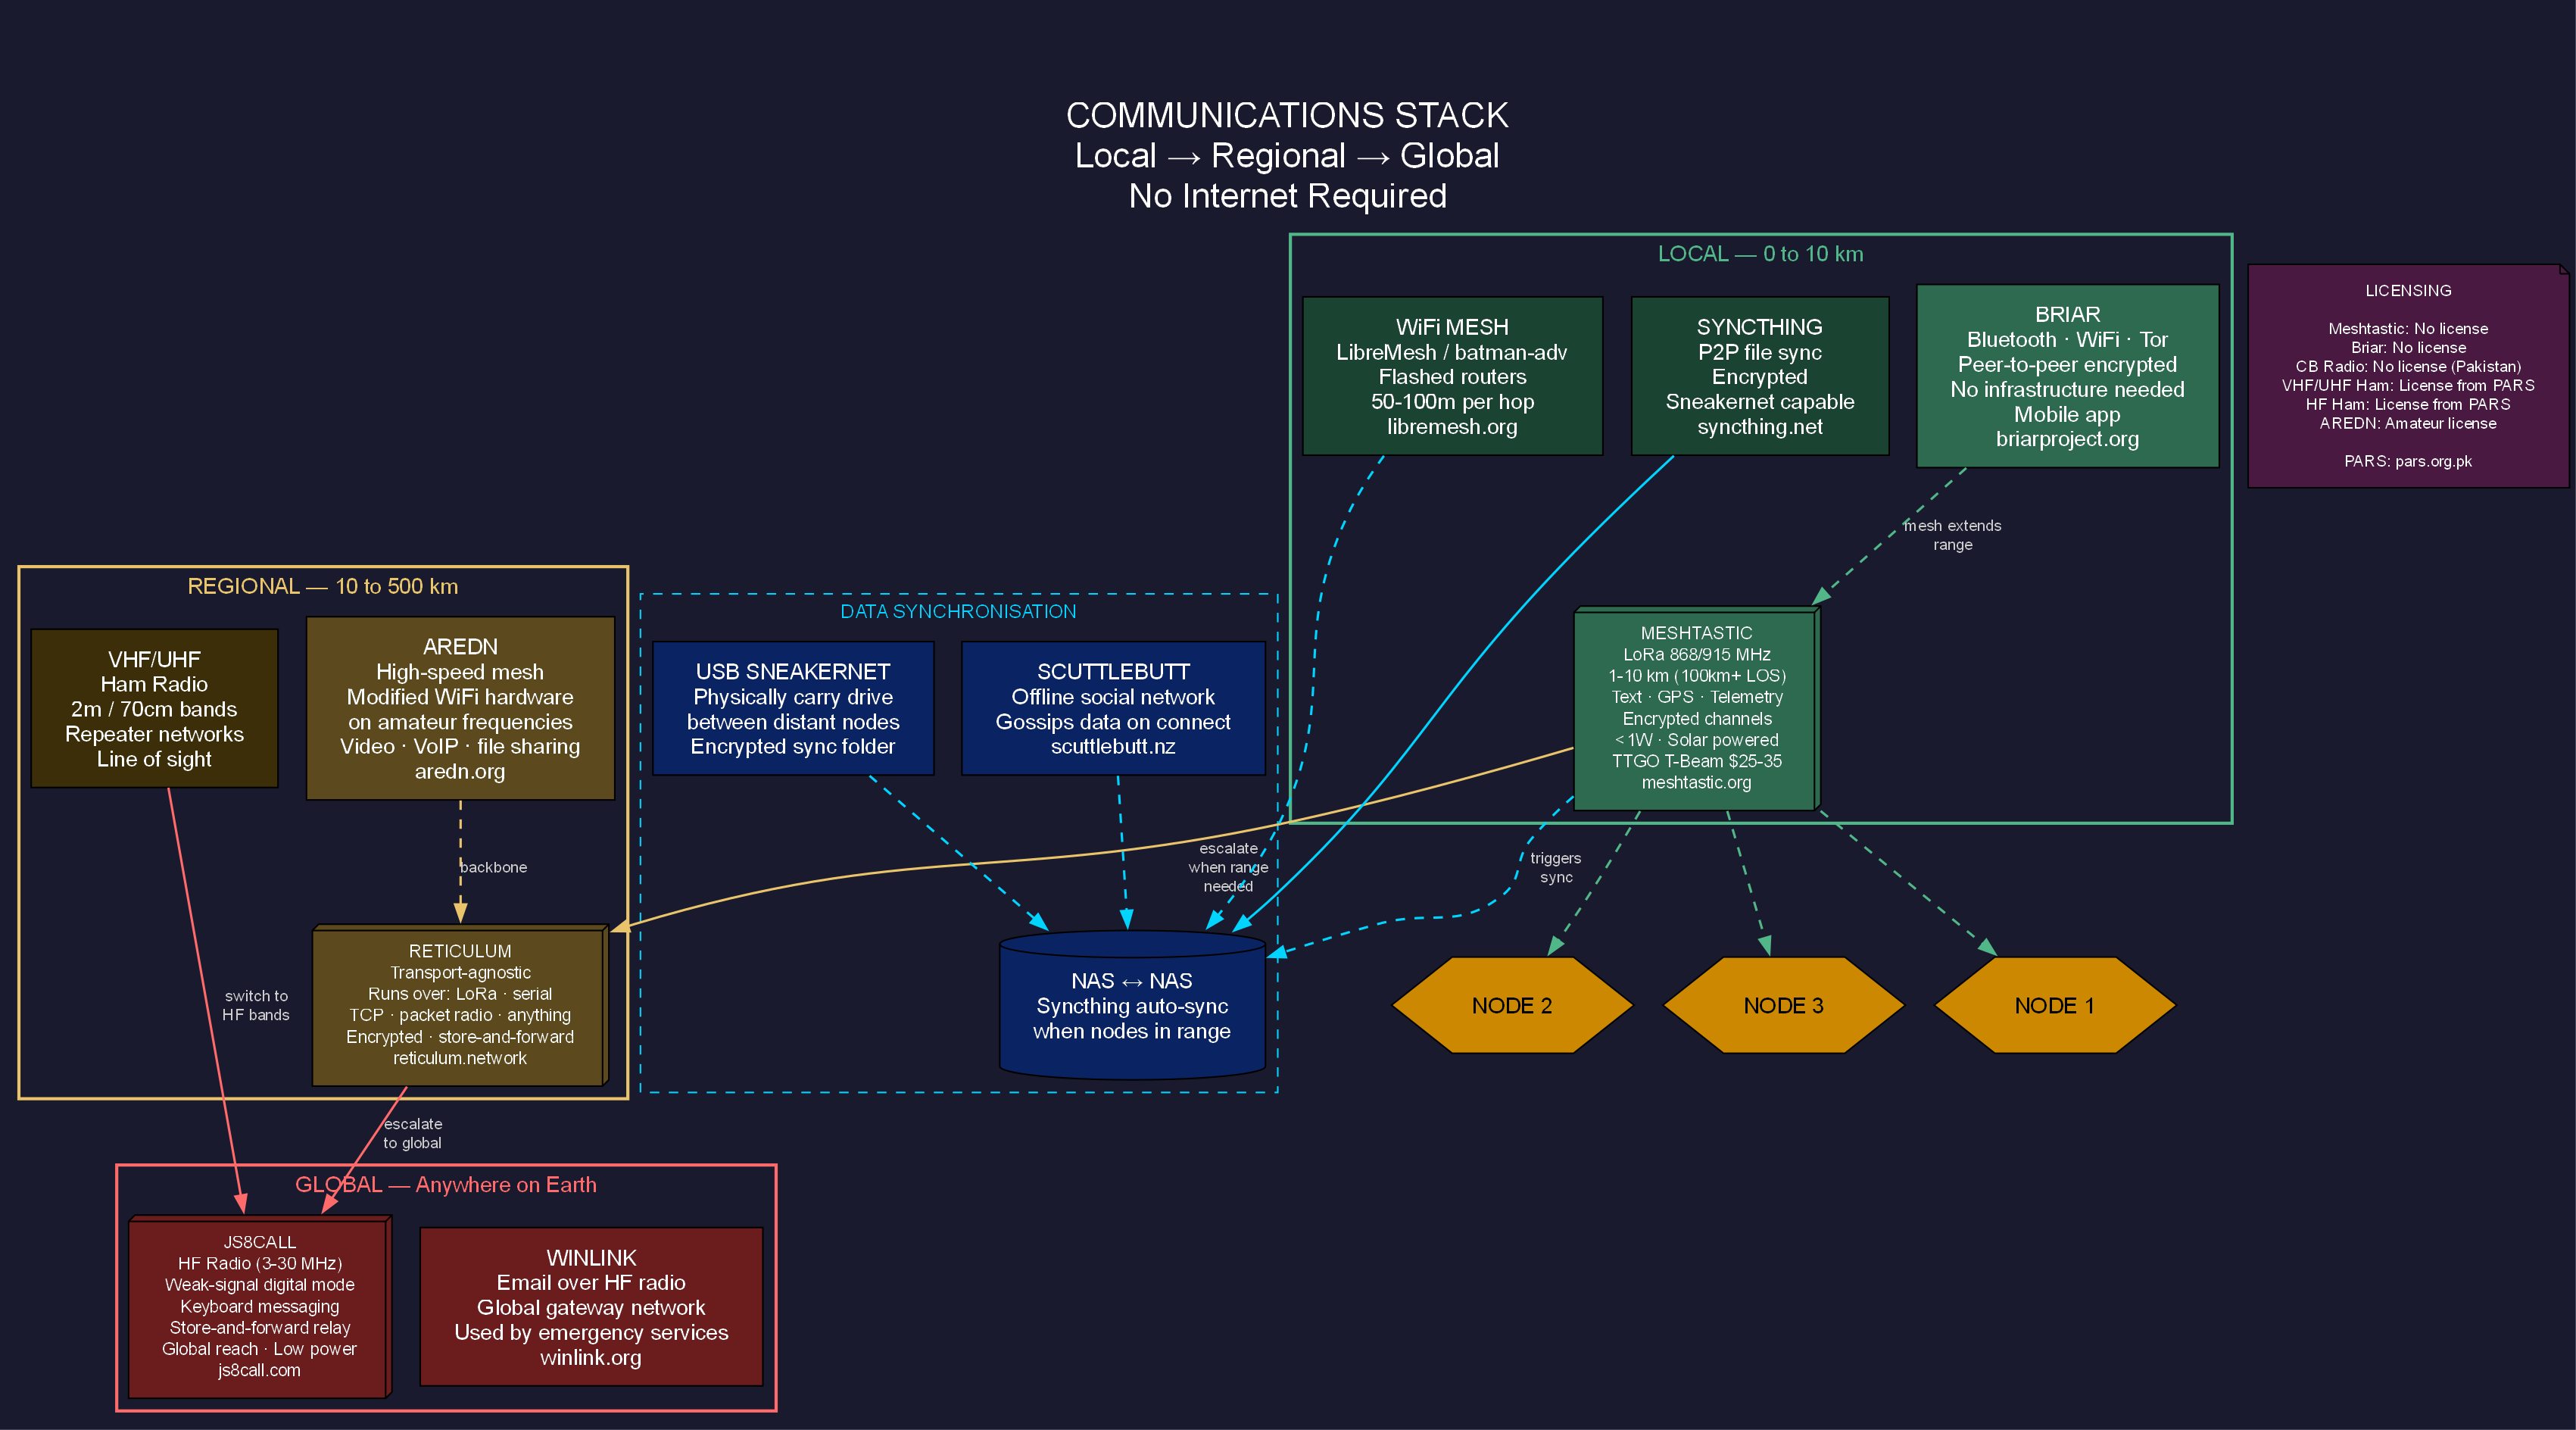
03 How LoRa Works
LoRa uses chirp spread spectrum (CSS) — the signal sweeps up or down in frequency, making it extraordinarily resistant to noise and interference. The trade-off: low data rate (1–10 kbps). You send text and telemetry, not video.
[Node A] ──LoRa RF──► [Node B] ──LoRa RF──► [Node C] ──LoRa RF──► [Node D]
           5 km               8 km               6 km

Each node stores → re-transmits → decrements hop count
Key RF Parameters
| Parameter | Range | Effect |
|---|---|---|
| Spreading Factor (SF) | SF7 → SF12 | SF7 = fast/short range. SF12 = slow/max range. Each step ~doubles range, halves speed. |
| Bandwidth (BW) | 125/250/500 kHz | Wider BW = faster but shorter range |
| Coding Rate (CR) | 4/5 → 4/8 | Higher CR = more error correction, slower |
| TX Power | 2–30 dBm | Each +3 dB doubles effective radiated power |
Modem Presets — pick one for the whole network
| Preset | Speed | Range | Use Case |
|---|---|---|---|
SHORT_TURBO | 21 kbps | <1 km | Dense urban, short range |
SHORT_FAST | 10 kbps | 1–3 km | Campus/event |
LONG_FAST | 1.07 kbps | 5–15 km | Recommended start |
LONG_MODERATE | 0.34 kbps | 10–20 km | Rural mesh |
LONG_SLOW | 0.18 kbps | 15–30 km | Sparse nodes |
VERY_LONG_SLOW | 0.09 kbps | 20–40 km | Extreme range, very patient |
04 Hardware
Recommended Boards (2024–2025)


Frequency Bands
| Region | Band | Notes |
|---|---|---|
| USA | 915 MHz | ISM band, no license |
| EU / Pakistan / most of South Asia | 868 MHz | Use EU_868 region in firmware |
| Asia-Pacific | 433 MHz | Longer range, more interference |
| China | 470 MHz | CN region |
EU_868 (868 MHz) which is legal in most of South Asia for low-power ISM use. Verify current NTRA regulations before deployment.Minimal Node BOM
05 Firmware Installation
Method 1 — Web Flasher (easiest, no tools needed)
- Visit
flasher.meshtastic.orgin Chrome or Edge - Plug board via USB — allow serial port access
- Select your device type from the dropdown
- Click Flash — done in ~60 seconds
Method 2 — Python CLI
pip install meshtastic esptool

# Erase and flash (replace /dev/ttyUSB0 with your port)
esptool.py --port /dev/ttyUSB0 erase_flash
meshtastic --port /dev/ttyUSB0 --flash
Method 3 — PlatformIO (for firmware development)
git clone https://github.com/meshtastic/firmware
cd firmware
cp platformio_override.example.ini platformio_override.ini
# edit platformio_override.ini to select your board target
pio run -e heltec-v3 --target upload
06 Basic Configuration
After flashing, configure via the Meshtastic app (Android/iOS) over Bluetooth, or via the Python CLI.
Essential settings via CLI
pip install meshtastic

# Set region (determines legal frequency)
meshtastic --set lora.region EU_868

# Set modem preset (all nodes must match)
meshtastic --set lora.modem_preset LONG_FAST

# Set node role
meshtastic --set device.role ROUTER

# Set node name (shown in app + mesh)
meshtastic --set owner "WaterNode-01"
meshtastic --set owner_short "WN01"

# Confirm settings
meshtastic --info
Region Codes
| Region | Code | Frequency |
|---|---|---|
| United States | US | 915 MHz |
| Europe / South Asia | EU_868 | 868 MHz |
| Europe (433) | EU_433 | 433 MHz |
| Australia/NZ | ANZ | 915 MHz |
| India | IN | 865 MHz |
| China | CN | 470 MHz |
07 Node Roles
Role determines how a node behaves in the mesh. Choosing the right role is critical for network performance and battery life.
| Role | Behaviour | Use When |
|---|---|---|
CLIENT | Connects to phone/app, relays messages | Default for end users |
CLIENT_MUTE | Receives but does NOT relay | Dense area, reduce congestion |
ROUTER | Relays only, no user messages | Fixed infrastructure node (rooftop, hill) |
ROUTER_CLIENT | Router that also accepts user connections | Base station with attached laptop |
TRACKER | GPS position reporting, optimised packet format | Asset tracking, person tracking |
SENSOR | Telemetry-optimised, minimal overhead | Environmental monitoring, IoT |
REPEATER | Pure RF repeater, minimal state | Dumb relay at RF-strategic location |
TAK | Tactical Awareness Kit integration | SAR, emergency services |
ROUTER nodes at high points (rooftops, hillsides) on solar power. End users carry CLIENT nodes. This maximises coverage with minimal congestion.08 Mesh Topology Design
         [ROUTER — hilltop, solar]
        /                \
[CLIENT]              [ROUTER — building rooftop]
 (phone)             /           \
                [CLIENT]       [CLIENT]
                (phone)         (sensor)
Hop Limit
Every packet carries a hop count. Each relay node decrements it. When it reaches 0, the packet is dropped. Default is 3 hops. For large networks:
meshtastic --set lora.hop_limit 5 # increase for large area networks
Flooding Algorithm
Meshtastic uses managed flood routing — each node re-broadcasts packets it hasn't seen before (tracked by packet ID + source). This is simple and robust, with no routing tables to maintain. Downside: busy networks can see airtime congestion with many nodes.
| Network Size | Recommendation |
|---|---|
| 1–10 nodes | Default settings, any role mix |
| 10–50 nodes | Designate explicit ROUTERs, set others CLIENT_MUTE where possible |
| 50+ nodes | Reduce hop_limit to 3, use managed channels, monitor channel utilisation |
09 Channels & Encryption
Meshtastic supports 8 simultaneous channels per node. Each channel has its own PSK (Pre-Shared Key) providing AES-256 encryption. Only nodes with the same channel name + PSK can read each other's messages.
Configure a private channel via CLI
# Create a private channel on slot 1 with a random PSK
meshtastic --ch-set name "WaterTeam" \
           --ch-set psk random \
           --ch-index 1

# Enable uplink to MQTT broker on this channel
meshtastic --ch-set uplink_enabled true --ch-index 1

# Show channel QR code (share with team)
meshtastic --qr
Share channels
Channel config (name + PSK) is encoded in a URL or QR code. Share the URL and any Meshtastic app can import it in one tap.
# Example channel URL format
https://meshtastic.org/e/#CgUYAyIBAQ==

# Scan in app → instantly joins channel with correct PSK
10 Python Library — Core Usage
pip install meshtastic
Connect and send
import meshtastic
import meshtastic.serial_interface

# Connect over USB serial
iface = meshtastic.serial_interface.SerialInterface("/dev/ttyUSB0")

# Broadcast to all nodes on primary channel
iface.sendText("Hello mesh!")

# Send to specific node by ID
iface.sendText("Hello!", destinationId="!abc12345")

# List all visible nodes
for node_id, node in iface.nodes.items():
    user = node.get('user', {})
    print(f"{node_id}: {user.get('longName', 'unknown')}")
    pos = node.get('position', {})
    if pos:
        lat = pos.get('latitudeI', 0) / 1e7
        lon = pos.get('longitudeI', 0) / 1e7
        print(f"  position: {lat:.5f}, {lon:.5f}")

iface.close()
Receive messages with callbacks
import meshtastic
import meshtastic.serial_interface
from pubsub import pub
import time

def on_receive(packet, interface):
    if 'decoded' not in packet:
        return
    msg = packet['decoded']
    if msg.get('portnum') == 'TEXT_MESSAGE_APP':
        text = msg['payload'].decode('utf-8')
        print(f"[{packet['fromId']}] {text}")
        print(f"  SNR: {packet.get('rxSnr')} dB  RSSI: {packet.get('rxRssi')} dBm")

def on_connection(interface, topic=pub.AUTO_TOPIC):
    print(f"Connected to node: {interface.myInfo}")

pub.subscribe(on_receive, "meshtastic.receive")
pub.subscribe(on_connection, "meshtastic.connection.established")

iface = meshtastic.serial_interface.SerialInterface("/dev/ttyUSB0")

try:
    while True:
        time.sleep(1)
except KeyboardInterrupt:
    iface.close()
Connect via TCP (WiFi-enabled boards)
import meshtastic.tcp_interface

# Heltec V3 and other ESP32 boards support TCP when on WiFi
iface = meshtastic.tcp_interface.TCPInterface("192.168.1.100")
iface.sendText("Hello over TCP!")
iface.close()
11 Telemetry & Sensors
Meshtastic has built-in support for environment sensors via the Telemetry Module. Sensors attach via I2C or SPI.
Supported sensor ICs
| Sensor | Measures | Relevance |
|---|---|---|
| BME280 / BME680 | Temp, humidity, pressure, air quality | Environmental monitoring |
| INA219 / INA260 | Current + voltage | Solar / battery monitoring |
| MCP9808 | Precision temperature | Water temperature |
| LPS22HB | Barometric pressure | Altitude, weather |
| SHTC3 | Temperature + humidity | General environmental |
Enable environment telemetry
meshtastic --set telemetry.environment_measurement_enabled true
meshtastic --set telemetry.environment_update_interval 300   # every 5 min
meshtastic --set telemetry.environment_screen_enabled true   # show on display
Custom telemetry on a private port
12 Protobuf — The Wire Format
All Meshtastic packets use Protocol Buffers (protobuf) for encoding. Understanding this lets you decode raw packets and build deep integrations.
pip install meshtastic protobuf
# Proto definitions: github.com/meshtastic/protobufs
from meshtastic import mesh_pb2, telemetry_pb2, portnums_pb2

# Decode a telemetry packet's raw payload
def decode_telemetry(raw_bytes):
    tel = telemetry_pb2.Telemetry()
    tel.ParseFromString(raw_bytes)

    dm = tel.device_metrics
    if dm.battery_level:
        print(f"Battery:     {dm.battery_level}%")
        print(f"Voltage:     {dm.voltage:.2f} V")
        print(f"Ch util:     {dm.channel_utilization:.1f}%")
        print(f"Air util TX: {dm.air_util_tx:.1f}%")

    env = tel.environment_metrics
    if env.temperature:
        print(f"Temperature: {env.temperature:.1f}°C")
        print(f"Humidity:    {env.relative_humidity:.0f}%")
        print(f"Pressure:    {env.barometric_pressure:.0f} hPa")
Key protobuf message types
| Message | File | Contains |
|---|---|---|
MeshPacket | mesh.proto | Envelope for all packets |
Data | mesh.proto | Payload + portnum |
Telemetry | telemetry.proto | Device + environment metrics |
Position | mesh.proto | GPS coordinates |
User | mesh.proto | Node identity + hardware model |
13 MQTT Bridge
Nodes with WiFi (ESP32 boards) can bridge the mesh to an MQTT broker, connecting your off-grid nodes to the internet when any gateway node is online.
Enable MQTT on a gateway node
meshtastic --set mqtt.enabled true
meshtastic --set mqtt.address "your-broker.com"
meshtastic --set mqtt.port 1883
meshtastic --set mqtt.username "user"
meshtastic --set mqtt.password "pass"
meshtastic --set mqtt.root "msh/PK"          # topic prefix
meshtastic --set mqtt.json_enabled true       # also publish decoded JSON
meshtastic --set mqtt.encryption_enabled true # keep packets encrypted on broker
MQTT topic structure
msh/PK/2/e/LongFast/!abcd1234       # encrypted protobuf
msh/PK/2/json/LongFast/!abcd1234    # decoded JSON (if json_enabled)
msh/PK/2/stat/!abcd1234             # node status
Subscribe to JSON packets in Python
import paho.mqtt.client as mqtt
import json

def on_connect(client, userdata, flags, rc):
    print(f"Connected, rc={rc}")
    client.subscribe("msh/PK/2/json/#")

def on_message(client, userdata, msg):
    try:
        data = json.loads(msg.payload)
        node_id = data.get('from')
        payload = data.get('payload', {})
        portnum = data.get('type')
        print(f"Node {node_id} [{portnum}]: {payload}")
    except json.JSONDecodeError:
        pass  # encrypted packet, skip

client = mqtt.Client()
client.on_connect = on_connect
client.on_message = on_message
client.connect("your-broker.com", 1883)
client.loop_forever()
Community MQTT broker (testing)
Host:  mqtt.meshtastic.org
Port:  1883  (plain)  /  8883  (TLS)
Topic: msh/world/#
14 Node-RED Integration
Node-RED is the easiest way to route Meshtastic MQTT data into databases and dashboards.
Flow example:

[MQTT in node]  →  [JSON parse]  →  [Switch on type]
                                    ├── telemetry  →  [InfluxDB write]
                                    ├── position   →  [Map widget]
                                    └── text       →  [Dashboard text]
Node-RED MQTT node config
The msg.payload will be a JSON object with keys: from, to, type, payload, channel, rxSnr, rxRssi, hopLimit.
15 JavaScript / TypeScript Library
npm install @meshtastic/js
import { Client } from "@meshtastic/js";

const client = new Client();

// Serial connection (Node.js or browser via Web Serial API)
const connection = client.createSerialConnection();
await connection.connect({
  port: "/dev/ttyUSB0",
  baudRate: 115200,
  concurrentLogOutput: false
});

// Send a text message
await connection.sendText("Hello from JS!");

// Listen for text messages
connection.events.onTextPacketReceived.subscribe((packet) => {
  console.log(`From ${packet.from}: ${packet.message}`);
  console.log(`SNR: ${packet.rxSnr}, RSSI: ${packet.rxRssi}`);
});

// Listen for position updates
connection.events.onPositionPacketReceived.subscribe((packet) => {
  const { latitudeI, longitudeI, altitude } = packet.data;
  console.log(`Position: ${latitudeI/1e7}, ${longitudeI/1e7}, ${altitude}m`);
});
The JS library supports Serial, TCP, and BLE transports — enabling browser-based dashboards via the Web Serial API or WebBluetooth.
16 Bluetooth (BLE) from Python
# Scan for nearby Meshtastic nodes over BLE
meshtastic --ble-scan
import meshtastic.ble_interface
import asyncio

async def main():
    # Use MAC address from ble-scan output
    iface = meshtastic.ble_interface.BLEInterface("AA:BB:CC:DD:EE:FF")
    iface.sendText("Hello over BLE!")

    # Get node info
    print(iface.myInfo)

    await asyncio.sleep(5)
    iface.close()

asyncio.run(main())
BLE is useful when nodes are nearby and USB is unavailable — e.g., configuring a sealed weatherproof enclosure through a smartphone app, or a Raspberry Pi talking to an adjacent LoRa node wirelessly.
17 Building a Tracker
Configure the node as TRACKER
Receive and log positions in Python
from pubsub import pub
import meshtastic.serial_interface
import sqlite3, time

DB = sqlite3.connect("positions.db")
DB.execute("""CREATE TABLE IF NOT EXISTS pos
    (ts INTEGER, node TEXT, lat REAL, lon REAL, alt INTEGER)""")
DB.commit()

def on_receive(packet, interface):
    if 'decoded' not in packet:
        return
    decoded = packet['decoded']
    if decoded.get('portnum') != 'POSITION_APP':
        return
    pos = decoded.get('position', {})
    lat = pos.get('latitudeI', 0) / 1e7
    lon = pos.get('longitudeI', 0) / 1e7
    alt = pos.get('altitude', 0)
    node = packet['fromId']
    DB.execute("INSERT INTO pos VALUES (?,?,?,?,?)",
               (int(time.time()), node, lat, lon, alt))
    DB.commit()
    print(f"[{node}] {lat:.5f}, {lon:.5f}  alt={alt}m")

pub.subscribe(on_receive, "meshtastic.receive")
iface = meshtastic.serial_interface.SerialInterface()

while True:
    time.sleep(1)
18 Range Testing & Optimization
Signal metrics decoded
| Metric | Range | Interpretation |
|---|---|---|
| RSSI | −140 to 0 dBm | Signal strength. Usable above −120 dBm. Closer to 0 = better. |
| SNR | −20 to +10 dB | Signal vs noise. LoRa decodes even at −20 dB SNR. Positive = strong link. |
def on_receive(packet, interface):
    rssi = packet.get('rxRssi', 'n/a')
    snr  = packet.get('rxSnr',  'n/a')
    hops = packet.get('hopStart', 3) - packet.get('hopLimit', 3)
    print(f"RSSI: {rssi} dBm  SNR: {snr} dB  Hops: {hops}")
Built-in Range Test module
# On the sending node:
meshtastic --set range_test.enabled true
meshtastic --set range_test.sender 60    # send ping every 60 seconds
meshtastic --set range_test.save true    # save results CSV to SD card
What improves range most?
| Change | Range Gain | Notes |
|---|---|---|
| Antenna height (+1 floor) | +20–40% | Cheapest improvement |
| 3 dBi → 6 dBi antenna | +3 dB = 2× | Better than more TX power |
| Reduce modem preset (LONG_FAST → LONG_SLOW) | +50–100% | Slower throughput trade-off |
| Increase TX power (+3 dBm) | +40% | Check legal limits; wastes battery |
| Clear line-of-sight | 5–10× | Terrain matters more than hardware |
19 Power Optimization
Typical current consumption
| State | Current | Notes |
|---|---|---|
| Active TX (30 dBm) | ~200 mA | Brief bursts only |
| Active RX / listening | ~15 mA | Most of awake time |
| Light sleep | ~2 mA | Between receive windows |
| Deep sleep (ESP32) | ~10–100 µA | Board-dependent |
A 3000 mAh battery with hourly transmit + mostly-sleep → several weeks per charge.
Power-saving configuration
Solar sizing (per node)
20 Remote Admin
You can configure remote nodes over the mesh — no physical access required. This is essential for managing deployed infrastructure nodes.
Remote admin requires your local node's key to be authorised as admin on the target node. Set this via security.admin_key during initial deployment.
21 Store & Forward
Store & Forward allows a router node to buffer messages for nodes that are temporarily offline, then deliver them when connectivity is re-established. Essential for sparse or intermittent mesh networks.
When a CLIENT node comes online, it sends a history request to the nearest Store & Forward router, which replays queued messages. This is asynchronous messaging without internet.
22 Map Integration — ATAK / TAK
Meshtastic integrates with the Tactical Awareness Kit (ATAK/iTAK) standard used by SAR teams and emergency responders.
Meshtastic node ──BLE──► Phone running ATAK / WinTAK
                                    ↓
                          TAK server (local or cloud)
                                    ↓
                          Shared Situation Awareness Map
Set node role to TAK — the firmware emits Cursor-on-Target (CoT) formatted position packets that ATAK can ingest directly.
Web map options (no ATAK required)
- Meshtastic Map —
meshtastic.liamcottle.net— public nodes worldwide via MQTT - MeshSee — connect to your MQTT broker, OpenStreetMap overlay
- Node-RED Dashboard — WorldMap node renders node positions on a local map, offline-capable
23 Community Mesh — Deployment Tips
Practical guidance for building a shared community mesh (e.g., for a village, NGO operation, or water monitoring network).
- Place ROUTER nodes at high points — rooftops, hilltops, water towers. Solar-powered. Weatherproof enclosures.
- Agree on region + modem preset before ordering hardware — changing later requires touching every node.
- Naming convention — e.g.,
PK-W-R01(Pakistan-Water-Router-01) aids at-a-glance identification. - Two channels minimum — Channel 0 (public, default PSK) for broad community messages; Channel 1 (private PSK) for operations team.
- One or two MQTT gateway nodes with internet/4G uplink — feeds dashboard and allows remote monitoring.
- Document each node's physical location in a shared spreadsheet (node ID → GPS + description).
- Carry a spare pre-flashed node — if a field node fails, replacement takes minutes.
- Test the mesh before deployment by walking the coverage area with a phone and logging RSSI per location.
| Role in Network | Hardware | Power | Qty (per 5 km²) |
|---|---|---|---|
| Backbone ROUTER | Heltec V3 + 6 dBi antenna | 1W solar + 3000 mAh | 2–4 |
| MQTT Gateway | T-Beam v1.2 (has GPS) | Mains / large solar | 1 |
| Sensor SENSOR node | Heltec V3 + INA219/BME280 | 0.5W solar + 2000 mAh | As needed |
| Field CLIENT | T-Beam or phone app | Phone battery | Per person |
24 Common Pitfalls
| Symptom | Cause | Fix |
|---|---|---|
| Nodes not seeing each other | Different region or modem preset | meshtastic --info on both nodes, confirm match |
| Range much worse than expected | Loose SMA antenna connector | Finger-tighten all SMA connections |
| GPS never locks | First boot indoors / no sky view | Take outside for 5 min, clear sky |
| Too many nodes, congestion | Every node relaying | Set non-infrastructure nodes to CLIENT_MUTE |
| Phone won't connect over BLE | Stale BLE pairing | Forget device in phone BT settings, re-pair |
| Packet collisions / lost messages | Hop limit too high | Lower lora.hop_limit to 3 |
| Battery drains fast | Screen always on / TX power at max | Set display.screen_on_secs 10, reduce TX power |
| Python library not finding device | Wrong serial port | Run meshtastic --port /dev/ttyUSB0 --info (try USB1 etc.) |
| MQTT packets not appearing | Wrong topic subscription | Subscribe to msh/# first, then narrow down |